Edges Panel
The Edges panel is for classifying edges — assigning each edge a type (eave, ridge, hip, valley, and so on).
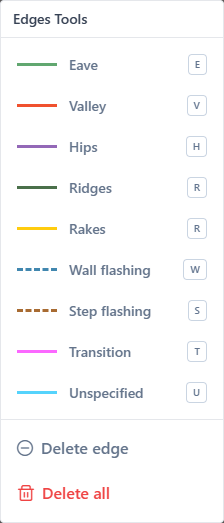
Edge types
Each button activates a type. Then click edges on the canvas to apply.
| Button | Type | Shortcut | Color |
|---|---|---|---|
| Eaves | eaves | E | green |
| Valleys | valleys | V | red-orange |
| Hips | hips | H | purple |
| Ridges | ridges | G | dark green |
| Rakes | rakes | R | yellow |
| High Eave | high_eave | A | teal |
| Parapet | parapet | P | orange (dashed) |
| Transition | transition | T | magenta |
| Wall flashing | wallFlashing | W | blue (dashed) |
| Step flashing | stepFlashing | S | brown (dashed) |
| Other | other | O | gray (dashed) |
| Unspecified | unspecified | U | cyan |
See: Edge types for when to use each.
Actions
Reset all edges
Sets every edge on the current layer to unspecified. A confirmation dialog appears.
Use when you want to reclassify from scratch without rebuilding geometry.
How classification works
- Pick a type in the panel (it becomes the active type).
- Click edges on the canvas — each clicked edge becomes that type.
- Switch the active type to label other edges with different types.
Active type stays selected between clicks — efficient for bulk classification.
Tips
- Classify after finishing geometry, not during drawing.
- Start with eaves (easiest to identify at the bottom of roof planes).
- Then ridges (highest horizontal lines).
- Then hips and valleys (diagonal interior edges).
- Use the listed shortcuts to switch types quickly.
Related
- Classify edges — hands-on workflow
- Edge types — type-by-type reference
- Keyboard shortcuts