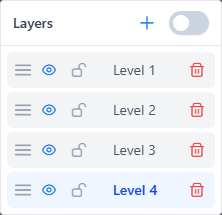
Layers
Layers are the vertical stacking order of your roof — from the bottom upward. Level 1 is the lowest, Level 2 sits above it, Level 3 above that, and so on.
The single rule that determines whether a new plane needs its own layer is:
If a plane overhangs or overlaps in plan view something you've already drawn, put the overhanging plane on a higher level than what it overhangs.
Planes that don't overhang each other — even at different heights or on different structures — can live on the same layer. Layer separation is only required when overhangs would confuse the facet detection and the report.
What is a layer?
A layer is an independent group of nodes, edges, and facets. Each layer:
- can be shown or hidden
- can be locked to prevent accidental edits
- is detected for facets separately — closed loops only form a facet if they are on the same layer
- has a sequential name —
Level 1,Level 2,Level 3, and so on (assigned automatically, from the lowest to the highest)
How to work with layers
Work bottom-up:
- Start on
Level 1. Draw every plane that doesn't overhang any other plane. - When you reach a plane that overhangs something already drawn, create
Level 2and draw it there. - If another plane overhangs something on
Level 2, createLevel 3— and so on.
You can place multiple planes on the same layer as long as none of them overhangs another plane on that same layer. One-plane-per-layer is not required.
Independent structures
If a structure is physically separate (its roof doesn't share any geometry with another structure and doesn't overhang anything), it doesn't matter which layer you draw it on. Keep it wherever it's convenient — often Level 1.
Layer separation for independent structures is purely an organizational preference, not a requirement.
Example: two-story house with a front porch
A two-story house. The main roof is on the second floor. On the first floor there is a porch (kazyrek / awning). The front of the main roof has an eave that overhangs the porch.
Level 1 — everything that isn't overhanging anything:
- the porch on the first floor
- the back part of the main roof (it doesn't overhang the porch, so it stays on Level 1 alongside the porch)
Level 2 — only the overhanging plane:
- the front part of the main roof (because it hangs over the porch on Level 1)
Note: the main roof is split across two layers — front on Level 2, back on Level 1. The split is not based on which structure they belong to, but on the overhang relationship. Back and porch coexist on Level 1 because they don't overhang each other.
Recommendation
When deciding if a new plane needs a new layer, ask: does this plane overhang anything I've already drawn?
- Yes → new layer, one step up.
- No → add it to the current layer (or any existing layer that it doesn't overhang).
Layer actions
From the Layers panel you can:
- Add a new layer (the next
Level Nname is assigned automatically) - Show / hide with the eye icon
- Lock / unlock with the lock icon
- Delete with the trash icon (confirmation is required)
- Reorder by dragging
INFO
Layer names are fixed and assigned by the system in order of creation. Custom renaming is not available in the current version.
Show all layers
The Show All Layers toggle displays every layer on the canvas at once, regardless of individual visibility settings. Useful when reviewing a multi-level roof as a whole.
Lock a layer
Locking a layer makes all its nodes, edges, and facets read-only until you unlock it. Nothing is deleted — you just can't accidentally edit it.
Use locking when a section is finalized and you want to protect it while working on another layer.
Delete a layer
Deleting a layer removes all its geometry — nodes, edges, and facets. A confirmation dialog asks you to confirm.
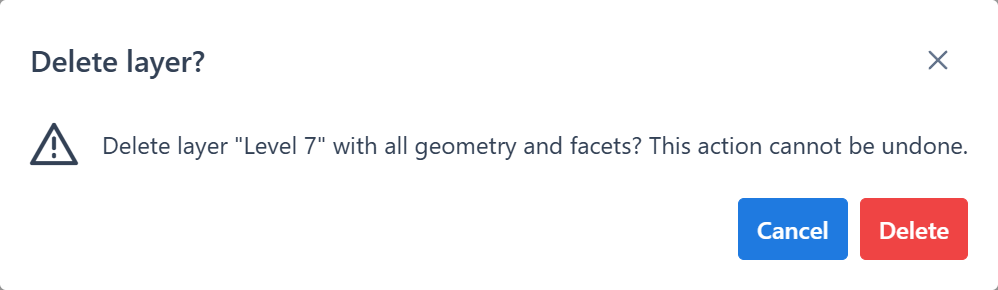
Important
Layer deletion cannot be undone. If you are not sure, hide or lock the layer instead.
Drawing across layers
Each new edge belongs to the active layer — the one currently selected in the Layers panel. You switch layers by clicking the layer name.
Attaching to another layer's point (optional)
Connecting layers through shared vertices is not required for the report to be correct. Each layer is measured independently, with or without shared points.
However, connecting them is strongly recommended for aesthetics and report cleanliness:
- the geometry in the report lines up in plan view — no visible gaps at junctions
- shared vertices act as anchor points, preventing small misalignments that look messy
- the traced roof matches the real building instead of looking like disconnected pieces
To connect two layers:
- Finish the geometry of the first layer (for example, the main garage on
Level 1). - Create the new layer (
Level 2) and switch to it. - Enable Show All Layers — the
Level 1geometry becomes visible (dimmed) while you work onLevel 2. - Start drawing. When a new corner should sit on an existing
Level 1vertex, move the cursor over that vertex — it highlights green. - Click. A duplicate node is created on
Level 2at the same coordinates. The two layers are now anchored at that point.
Show All Layers is key
Without Show All Layers, the other layer's geometry is invisible on the canvas. Snap still works technically, but you can't see what you're aiming at.
See: Work with layers for the full workflow.
Facet detection and layers
Facets are detected per layer, independently. Two layers that overlap geometrically still produce separate facets.
This is exactly why layers exist — without per-layer detection, a plane passing under an overhang would be merged with the plane above it and the report would treat them as one, losing measurements for the overhung section.
Common mistakes
A facet I expected to appear is missing
Check the layer of every edge around the polygon. If one edge is on a different layer, the loop is not closed on any single layer and no facet is detected.
Two adjacent sections can't be merged into one facet
They may be on different layers. Move all the required edges to one layer, or redraw them on the same layer.
I deleted the wrong layer
Layer deletion cannot be undone, but if the project was saved before the deletion you can reopen the saved version. Save early and often.
What to read next
- Edges and facets
- Work with layers — hands-on workflow
- Draw edges