Toolbar Reference
This page documents every action in the top toolbar of Roof Layout Studio, from left to right.

Project actions
New project
Icon: file-plus.
Starts a new project. If another project is open, a confirmation dialog appears asking whether to reset the current workspace.
- Saved work: auto-saved before reset — the current project is preserved on the server.
- Unsaved work: lost if confirmation is accepted without saving first.
Save project
Icon: save.
Saves the current project to the server. Updates the timestamp on the Open project list.
INFO
The editor also auto-saves in the background at regular intervals. Manual save is useful to mark an explicit checkpoint.
Open project
Icon: folder-open.
Opens a dialog with all saved projects. Each row shows:
- project name
- address (if set in project info)
- last modified date
- status (new / in progress / completed)
Click a project row to open it. The current workspace is replaced — confirm the reset if prompted.
Project metadata
Project information
Icon: info-circle.
Opens the Project Information modal where you set:
- project name
- address
- prepared-by name
- other optional fields
Project information appears in the generated report.
See: Project Information.
Status
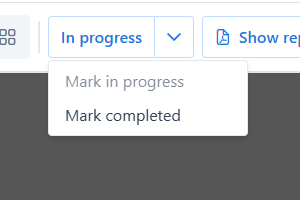
Status indicator and dropdown
Shows the current project status and lets you change it:
- New — the default state after creation
- In progress — active work
- Completed — ready for delivery
Click the status badge to open the dropdown. Select a new status — the status indicator updates and the timestamp is recorded.
Report actions
Generate report
Icon: file-export.
Starts the report wizard. The app validates the project (scale set, pitch and edges assigned) and generates a PDF. The wizard walks through a couple of confirmation steps before producing the PDF.
See: Report.
Show report
Appears only when a report has been generated. Opens the last generated PDF.
Download PDF
Downloads the most recent PDF report to your computer.
Email PDF
Opens the email form to send the report to a specified address.
Panels
Icons in the top-right area switch between editor modes:
- Draw (pencil icon) — create and edit edges (Draw Panel)
- Edges (lines icon) — classify edge types (Edges Panel)
- Facets (polygon icon) — assign pitch and slope direction (Facets Panel)
Clicking a mode icon opens the corresponding panel on the right side of the screen.
Settings and account
Documentation
Icon: help/question.
Opens this documentation in a new tab.
Settings
Icon: gear.
Opens the Settings modal where you set:
- interface language
- report language
- measurement units (Imperial / Metric)
See: Settings.
Logout
Icon: sign-out.
Signs out of the account. Unsaved changes are saved automatically before signing out.